For soft cakes and muffins, reach for pea protein or a whey and casein blend. For moist quick breads and pancakes, use a whey blend with extra liquid built in. For thin, crisp cookies, collagen wins. The single rule that saves every one of these bakes: swap in protein powder for no more than 20 to 33% of your flour by weight, drop your oven temperature and add moisture to compensate.
TL;DR:
- Use no more than one-third of the flour weight in protein powder to avoid dryness and adjust liquid ingredients accordingly.
- Whey protein is best for moist baked goods like pancakes and banana bread due to its browning ability but can make baked goods drier if not compensated.
- Pea protein yields the softest crumb with a mild flavor but can add a legume note, which vanishes in flavored recipes like chocolate or spice.
- Collagen is ideal for thin, crisp cookies because it does not trap air or create a crumb structure, leading to spread-out, crunchy results.
- Lower oven temperatures by 15 to 25°F and check baked goods early to prevent over-browning and undercooking caused by rapid protein setting.
Table of Contents
What’s the Best Protein Powder for Baking?
There’s no single best protein powder for baking. There’s a best protein powder for your recipe, and the answer changes depending on whether you’re making a fluffy cake or a chewy bar. That’s the mistake most home bakers make when they first start baking with whey protein or any other powder: they treat it like flour, dump it in at a 1:1 ratio, and end up with something closer to a hockey puck.
Protein powder isn’t flour. It doesn’t behave like starch, and it doesn’t form gluten. It’s mostly concentrated protein with almost no starch to soften the bite, which is why it soaks up liquid aggressively and sets faster in the oven. Once you understand that, the rest of the decisions get a lot easier.
Whey concentrate and whey isolate
Whey is the most common protein powder in baking, and for good reason. It’s flavor-neutral in unflavored form, it dissolves cleanly, and it browns beautifully thanks to the Maillard reaction kicking in early. Industry technical guidance on U.S. whey ingredients in bakery products shows that whey concentrates and isolates are already used at small percentages in commercial formulations to improve browning and tenderness, typically under 5%, not just protein content.
The catch is dryness. Whey pulls moisture out of a batter faster than flour does, and if you don’t compensate, you’ll get a bake that looks fine on the outside and tastes like cardboard on the inside. Whey works best in recipes where you’re already adding wet ingredients, like banana bread, brownies, or pancakes, where a little extra yogurt or oil easily offsets the drying effect.
Pick whey if: you want a neutral flavor base, you’re baking something with built-in moisture (banana, applesauce, oil), and you care about a good golden crust.
Pea protein and pea blends
Pea protein consistently produces the softest, most cake-like crumb of any single protein source. In blind test-kitchen comparisons run by Women’s Health, pea protein came out ahead for overall texture, beating out whey and several plant blends in side-by-side cakes and cookies. It’s also the default choice if you’re baking dairy-free or vegan, since it holds structure without any casein or whey derivatives.
The trade-off is flavor. Pea protein carries a mild legume note that some bakers notice right away and others never pick up on, especially once vanilla, cinnamon, or cocoa are in the mix. It masks easily in chocolate or spiced recipes and is harder to hide in something delicate like a vanilla mug cake.
Pick pea protein if: you want the softest, most cake-like texture, you’re avoiding dairy, or you’re baking something bold-flavored enough to cover a faint earthy note.
Casein and whey/casein blends
Casein digests slower than whey, and it also behaves differently in the oven. It holds onto water longer during baking, which makes it one of the more forgiving proteins for dense, moist bakes like brownies, protein bars, or thick muffins. Blends that combine whey and casein tend to split the difference: you get some of whey’s browning and neutrality with casein’s moisture retention.
Pick casein or a whey/casein blend if: you’re making something dense on purpose (bars, brownies, thick muffins) and you want forgiveness if you slightly overbake it.
Collagen peptides
Collagen behaves nothing like the others. It has almost no structure-building capacity in a batter, which sounds like a disadvantage until you realize it’s exactly what you want for a thin, crisp cookie. Because collagen doesn’t trap air or build a crumb, cookies spread thinner and crisp up at the edges instead of puffing into a cakey dome. The same test-kitchen research found collagen was the standout choice for crisp, spread-out cookies specifically, while other proteins made denser, cakier results.
Collagen has zero flavor and no aftertaste, which is a real advantage in delicate bakes. It won’t work for anything that needs to rise or hold a tall shape, like a layer cake or a muffin.
Pick collagen if: you want thin, crisp cookies or no-bake treats and don’t need any lift or structure from the powder.
Plant blends and single-source plant proteins
Blended plant proteins (pea plus rice, pea plus pumpkin seed, and similar combinations) vary more from brand to brand than whey or casein do, because the ratio of proteins changes how much water each one absorbs. Expect denser results than whey or pea alone unless the recipe already builds in extra fat or liquid. If you’re experimenting with a new plant blend, start with a small test batch, like a single muffin or a mug cake, before committing a whole tray of ingredients to an unfamiliar powder.
How Do You Substitute Protein Powder for Flour?
Weight matters here because protein powder is denser than flour. A cup of whey isolate weighs more than a cup of all-purpose flour, so measuring by volume throws off your ratios before you’ve even started mixing.
Baker-tested guidance from Dessert Done Light recommends starting around one-third of the flour replaced by weight, then adjusting from there based on how the batter looks going into the pan. That one-third mark is a strong starting point for cookies and bars.
Step-by-step: adapting any recipe
-
Weigh your flour first. Use a kitchen scale, not a measuring cup, for both the flour and the protein powder you’re replacing it with.
-
Swap 20 to 33% of that weight for protein powder. Cookies and bars tolerate the higher end; cakes and pancakes do better closer to 20%.
-
Add moisture back in. For every quarter cup of protein powder added, mix in roughly two extra tablespoons of Greek yogurt, one additional egg, or two tablespoons of oil, depending on what the recipe already uses.
-
Add structure if the batter looks loose. A tablespoon of cornstarch or oat flour helps lighten a dense protein-heavy batter, and it’s the fix Dessert Done Light points to for recipes that come out gummy.
-
Hydrate plant proteins before baking. Pea and other plant blends absorb liquid slower than whey. Let the batter rest 5 to 10 minutes before it goes in the oven so the powder fully hydrates instead of soaking up moisture mid-bake.
-
Mix gently and just until combined. Overmixing protein-heavy batter builds toughness fast, since you’ve already lost the tenderizing effect of a lower-protein flour ratio.
Pro Tip: Mix your protein powder into the dry ingredients first, before any liquid touches the bowl. Protein powders clump when they hit moisture directly, and a quick whisk through flour, baking powder, and salt breaks up those clumps before they ever get the chance to form.
Ingredient swaps that make the biggest difference
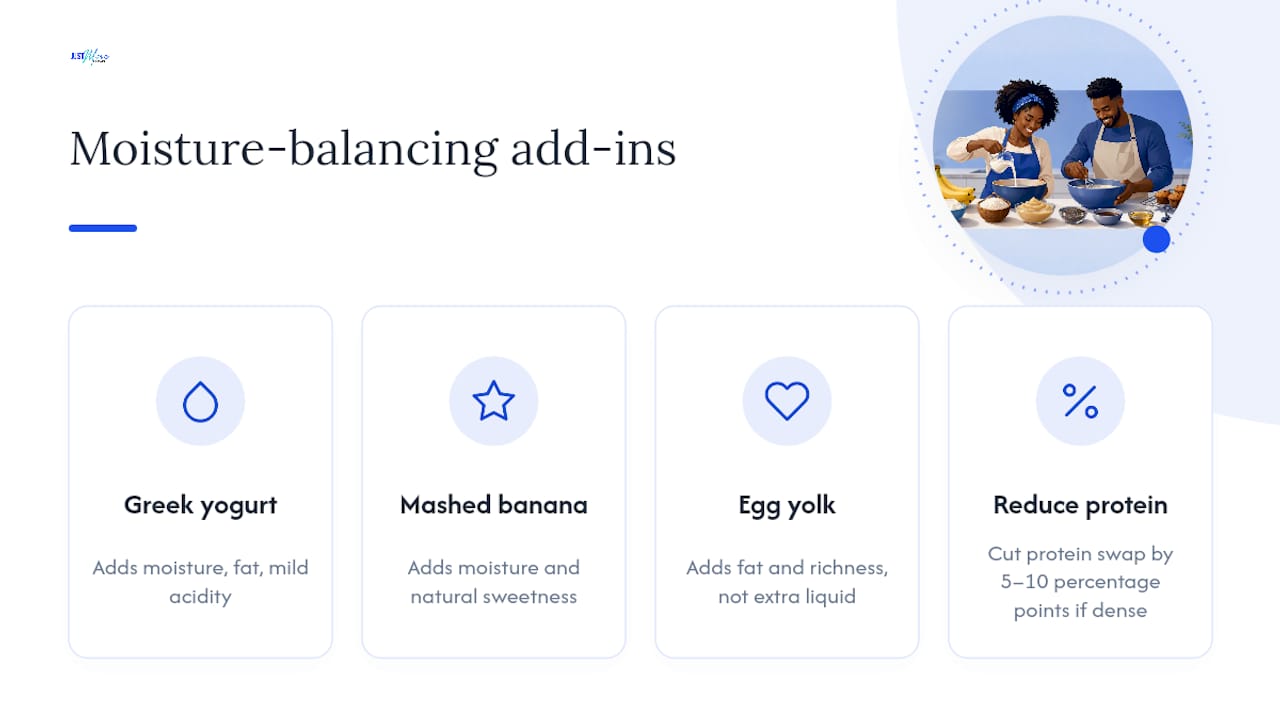
Greek yogurt is the single most useful add-in across nearly every protein-baking recipe, because it adds moisture, a little fat, and mild acidity that helps activate baking soda. Mashed banana works almost as well and adds natural sweetness, which lets you cut back on added sugar. An extra egg yolk (on top of what the recipe already calls for) adds fat and richness without thinning the batter the way more liquid oil can. If a recipe still comes out dense after these adjustments, cut the protein swap back by 5 to 10 percentage points before you try again. Small adjustments beat starting over.
Why Do You Need to Lower the Oven Temperature?
Protein sets faster than starch does, and that single fact changes how you need to bake. Whey protein denatures, meaning it firms up permanently, at roughly 160°F, well before a traditional flour batter finishes setting. According to Meals Done Quick, that early set means protein-rich batters brown and firm up faster than standard recipes, which is exactly why a bake that looks perfectly timed on the outside can still be raw or overly dry underneath.
The fix is straightforward:
-
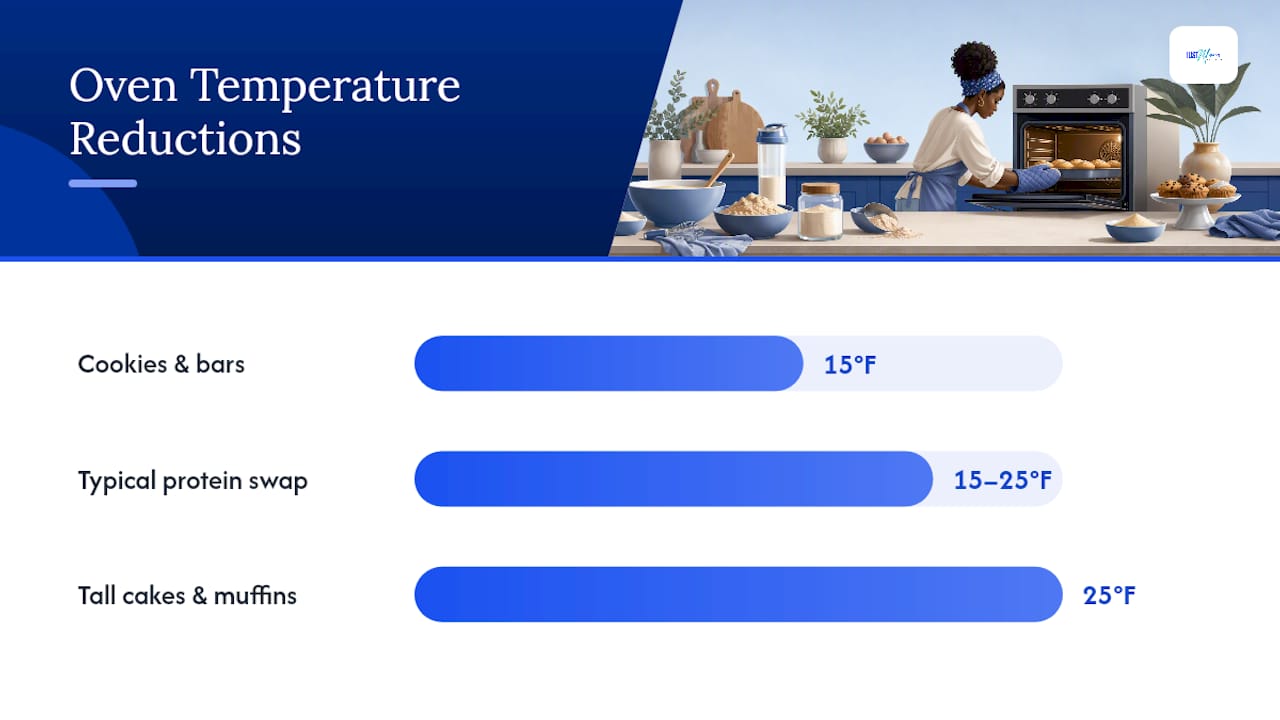
Lower your oven temperature by 15 to 25°F from what the original recipe calls for.
-
Start checking for doneness 3 to 5 minutes earlier than the recipe’s stated bake time.
-
Watch the crust color, not just the toothpick test. Protein-heavy bakes brown from the Maillard reaction faster than starch-based ones, so a golden top doesn’t always mean the inside is done.
-
Tent with foil if the top is browning before the center sets, especially in cakes and thick muffins.
The American Society of Baking notes that whey’s browning and gelling behavior is exactly why commercial bakeries use it at controlled, low percentages rather than swapping it in freely. Home bakers benefit from the same discipline. A cookie or bar might only need the temperature dropped by 15°F, while a taller cake or muffin benefits from the full 25°F reduction, since the center takes longer to reach the same internal temperature as the edges.
If your bake keeps coming out darker than you’d like even after lowering the temperature, that’s not a failure, it’s the protein doing what it does. Accepting a slightly deeper crust color, rather than fighting it with a lower temperature that leaves the center undercooked, is often the better trade.
Recipe Adaptations Worth Trying This Week
These five adjustments apply everything above to specific bakes, so you can test the rules instead of just reading about them.
-
Protein muffins: Replace ⅓ cup of flour with ⅓ cup of pea protein or a whey/casein blend in a standard 12-muffin recipe. Add 2 tablespoons of Greek yogurt and one extra egg white. Bake at a temperature moderately lower than usual, for example around 350°F instead of 375°F, and check at the 16-minute mark instead of 20.
-
Protein pancakes: Skip the flour-swap math entirely and blend ½ cup oats, one scoop of whey or pea protein, one banana, one egg, and enough milk to reach pourable consistency. This “shortcut” method sidesteps clumping issues since everything hydrates together in the blender. A flavored powder like Banana Pudding Protein leans into the banana base nicely here.
-
Cookies, two ways: For thin, crisp cookies, use collagen for 25% of the flour weight and slightly increase butter. For thick, chewy cookies, use a casein-heavy blend at the same ratio and add one extra tablespoon of brown sugar to hold moisture.
-
No-bake protein bars: Skip the oven altogether. Combine 1 cup oats, ½ cup protein powder, ¼ cup nut butter, and ¼ cup honey or maple syrup, then press into a pan and refrigerate for an hour. This is the fastest way to turn homemade protein bars into a weekly habit without touching the oven temperature debate at all.
-
The one-minute mug cake test: Before committing a new protein powder to a full recipe, mix 2 tablespoons of it with 2 tablespoons of flour, a splash of milk, a beaten egg, and a pinch of baking powder in a mug. Microwave 60 to 90 seconds. This tells you in under two minutes whether that specific powder runs dry, dense, or gummy in your kitchen, before you risk a full batch on it.
That mug-cake test matters more than it sounds. Community baking discussions, including threads on Reddit’s baking forum, consistently point out that different brands and processing methods bake differently even within the same protein category. A whey isolate from one brand can behave nothing like a whey concentrate from another. Testing small before you commit a whole batch saves both ingredients and disappointment.
Fixing Common Protein Baking Problems
Most protein-baking failures trace back to one of five fixable issues.
-
Dry or rubbery texture: Cut your protein swap back by 5 to 10 percentage points and add one extra tablespoon of oil or Greek yogurt per cup of dry ingredients. Double-check your oven temperature; this is the most common culprit.
-
Pea protein aftertaste: Lean into bold flavors like cocoa, cinnamon, or espresso, which mask the mild legume note easily. If the flavor still bothers you, a flavored SKU rather than unflavored pea can hide it further.
-
Collagen batter spreading too thin: Reduce the protein swap slightly and add a tablespoon of flour back in, or chill the dough for 20 minutes before baking to slow the spread.
-
Clumping in the batter: Sift the protein powder with your dry ingredients before adding any liquid, and consider an instantized powder, which dissolves more readily than standard milled powder.
-
Storage issues: Keep opened protein powder sealed and in a cool, dry spot. Humidity is what causes clumping over time, not the powder going bad.
Pro Tip: If you’re not sure which protein caused a bad bake, the fastest diagnostic is the mug-cake test from the previous section run twice: once with your usual ratio, once at half that ratio. If the half-ratio version bakes clean, your issue is quantity, not the protein itself.
For a deeper breakdown of texture problems specifically, this troubleshooting guide walks through fixes for gumminess, grittiness, and density in more detail than a quick list can cover.
What People Get Wrong About Protein Baking
Most advice about baking with protein powder treats it as a nutrition upgrade with no downside, as if you can swap it in freely and just end up with a healthier version of the same cookie. That framing sets people up to fail on their first attempt and quit before they find the ratio that actually works.
The better mental model: protein powder is a structural ingredient, not a flavor add-in or a nutrition boost you sprinkle on top. It competes with flour for the same job (building the crumb) while behaving completely differently once heat hits it. Baking doesn’t meaningfully strip away that nutrition either. Research on whether heat destroys protein powder’s nutritional value confirms that a meaningful portion of the protein content survives normal baking temperatures, so the payoff you’re baking for is still there when the timer goes off.
What surprises a lot of first-time protein bakers is how much the type of protein matters more than the brand or the price point. A $15 tub of pea protein and a $40 tub of pea protein will behave almost identically in a muffin recipe, because the texture outcome is driven by the protein source, not the marketing on the label. Where money is better spent is on variety: having two or three protein types on hand (a neutral whey for pancakes, a pea protein for cakey bakes, a collagen for cookies) does more for your baking success rate than any single “best” powder ever could.
— Just
Where Just Move Supplements Fits Your Baking
If you’re baking cakes, muffins, or pancakes and want a protein that won’t fight your flavors, Plain And Simple - Unflavored Protein is built for exactly that. Start at the 20 to 33% flour swap covered earlier, and its neutral profile means it won’t clash with vanilla, citrus, or spice-forward recipes the way some flavored powders can.
If you’re still figuring out which protein and flavor combination works best in your oven, the Just MOVE Protein Sample Variety Pack lets you run the mug-cake test across seven flavors before committing to a full tub. That’s a real advantage over buying a large bag of an untested powder and hoping it bakes the way you need it to.
For recipe-specific pairings, Banana Pudding Protein works especially well in banana bread and pancakes where its flavor profile reinforces the recipe rather than competing with it, while Salted Caramel Protein and Chocolate Cake Protein both hold up in cookies and bars where a bolder flavor masks any earthy protein notes. If you’re building out a full baking rotation, the 15 Serving Protein Variety Bundle covers multiple flavors without the cost of committing to several full-size tubs at once.
Ready to test your next batch? Start with the sample pack or the unflavored base, run the mug-cake test from this guide, and scale up once you’ve found the ratio that works in your kitchen.
Sources
Recommended


